Saturday, September 21, 2013

Saturday Simple Happinesses: Earl Grey Tea Latte

I am having one of those mornings where it seems like everything on your to-do list is blissfully accomplishable, but that you just really shouldn't start accomplishing anything yet. After a hectic work week, I am basking in a slow start to Saturday with my girls. T was up and out early for a Saturday golfing session, but yours truly managed to sleep in a full hour and a half later that weekday awake-time. 

One of things that helped my thurvival (thrive+survive #cspp) this week was the discovery that Starbucks makes Early Grey Tea Lattes. True confessions...I really dislike the taste of coffee. I adore the smell and truly appreciate the way adding just  a bit intensifies the taste of chocolate in baked goods (how can you not appreciate that?), but I've just never been a coffee drinker. 
As my Saturday Simple Happinesses gift to myself this morning, I decided to try and recreate my latest favorite at home. 
To begin, I brewed half a cups worth of earl grey tea and let it steep while I heated the milk, in order to have an intense flavor base. 
Then, I warmed up about a 1/2 cup of  2% milk in a saucepan over medium heat on the stove. When it was hot, I poured into my Bodum milk frother...I love this little guy. 
After about 30 seconds of aeration, the milk nearly tripled in volume and was ready to become a part of my luscious latte. 
Add the milk to to the tea and there she blows (yes, funny nautical phrasery just randomly popped into my mind). Frothy, yummy, a touch of caffeine, and a motivational mug. 
So, now I am enjoying this lovely drink, in the company of this even better view:
Happy slow Saturday to you all, 

-The Delicious Dabbler

Saturday, September 14, 2013

Donuts and Design

Two days ago, my sister-in-law, Katie, asked if I might want to make donuts this weekend. She is a donut connoisseur and we had been throwing the idea for awhile. Well...today was our day! After a quick run to the store this morning, we got baking and glazing. 
Accompanied by the tunes of my Boyce Avenue Pandora station, we started whipping up these beauties using Ina Garten's Cinnamon Baked Donuts recipe. Ina never lets me down. 
Ina's original recipe is for traditional-sized donuts, but Katie and I opted for minis this morning. Not over mixing the batter is key to a light, fluffy donut...you can see the air pockets in these little-uns. 
While our second batch was in the oven, Katie made some coffee and poured it into by favorite mug (HP nerds unite). It is pretty hard to beat the smell of donuts and fresh-brewed coffee in your kitchen. 
We rolled half the donuts in butter and cinnamon/sugar...and then thought to ourselves, 'Is this heaven?'
The other half got a Chocolate Ganache Glaze dunking. 

We piled them high on cake stand and then delighted in a late morning breakfast. 
Rosy joined us as a VIP guest. 

It was so fun to bake with my sister-in-law this morning. She is a bundle of passion, energy, and love...and seeing her face after she bit into the first cinnamon sugar donut was the best :) 
While Katie adores donuts, her true love is art and she is absolutely amazing. She is the proud owner of QueeniKathleeni Designs and recently opened her own Etsy Shop. Katie creates stunning fashion illustrations and also creates custom pieces. The picture above is a custom bridal illustration that she gave to T and I for our wedding. It hangs in our bedroom and brings a smile to my face every time I look at it. We also hired Katie to do a custom illustration of my brother, his wife, and their dog earlier this summer as a wedding present. If you are looking for wonderful art for your space, or a unique and meaningful gift idea, check out her site!

Happy Saturday dabblers. Hope yours is filled with love and a little butter :)

-The Delicious Dabbler


Sunday, September 8, 2013

Ultimate Game Day Nachos

Happy Sunday dabblers! Sundays in the fall around our house usually look like a walk around the lake in the morning and then settling in for a day of football watching, appetizer eating,  and occasional napping (usually me and Bales dip out for a few quarters of the 3:30pm game). Well today, we are in fine fall form. I have officially walked, footballed, appetizered, and napped. Post-nap...I am ready to bring this recipe happiness to you. 

 As the first football Sunday of the season, I wanted to kick things off with my favorite appetizer: Ultimate Game Day Nachos. 
I love love love this recipe and it is one of the more requested things that I make. Nothing quite like layers of loveliness combined with football to bring a crowd around.
Step 1. To get things started, brown up 1lb of your favorite nacho meat. Today, I sauteed ground chicken with onions, garlic, cumin, red pepper, salt, and pepper. Cumin is my go to spice for nachos (you'll see it again later), so I tend to go heavy on the cumin. 
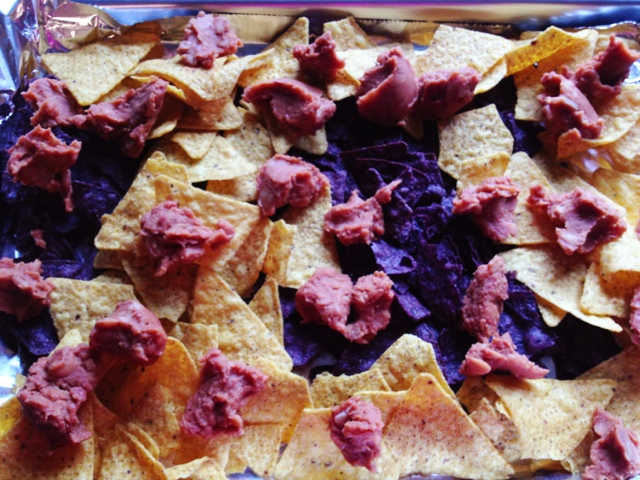
Step 2. Whilst your chicken/ground beef/protein-of-choice is browning, preheat your oven to 350F. Grab your favorite baking sheet and line it with aluminum foil (for easy, roll-it-up cleaning later). Spread your favorite tortilla chips in a single layer over the foil. I like a combo of blue and yellow corn chips, but T prefers the yellow corn so I added a bit more of those today. Chip placement is essential here...aim for a single layer of chips, with slight overlap. You want each chip to be exposed to the delicious toppings that are coming their way. *Ps. Don't forget about your chicken; when it is cooked all the way through, remove it from heat and set it aside for use shortly. 
Step 3. Dollop your favorite kind of refried beans onto the chips. T's fave is refried pinto beans, so that's what I went with today, but I love refried black beans on these as well. 
Step 4. Cover the chips and beans with shredded cheese. We had some cheddar to use up in the fridge today, but use your favorite. I frequently use Colby or Monterey Jack. Try to get a little bit of cheese on every chip so you don't end up with that one chip that everyone is avoiding because it has no toppings...you know the one I'm talking about. You've probably been that person that eats around it!
Step 5. Add the spice! Jalapeños are a must for any sort of ultimate nacho. If you aren't a huge spice person, try using one and removing the seeds and ribs from the inside (that's where the heat is...the jalapeños will also lose a bit of their punch when they bake in the oven). T and I went a little on the spicier side today: one jalapeño with the seeds and ribs left in, and one with them removed. Whatever your heat-level choice may be, chop up the jalapeño into small pieces and sprinkle it atopst (every word gets better when you add "st" to the end?) the chips. 
One of my favorite thing about theses nachos is how gorgeous they are. Layer upon layer of different colors, textures, and flavors...with a crunchy corn chip base- how can you go wrong?
Step 6. Add your favorite fresh salsa to the mix. I like Salsa Lisa, mild. Again, loving those vibrant contrasting colors. 
 Step 7. Add sliced black olives. I only added them to half the sheet of nachos because T isn't the biggest fan. Although, upon reviewing this picture, it looks like they accidentally (?) creeped onto T's side....ye who makes the nachos, gets to stake a claim to at least 3/4 of the pan. 
Step 8. Top the deliciousness with the ground chicken/onions/garlic. 
Step 9. Add a bit more grated cheese to the top to help bind everything together. 
Step 10. As the final step before placing your pan of glory into the oven, give the whole thing a sprinkling of cumin. Judging by the low levels in my jar, this spice is used often in our house....after today's bout of nachos, I need to head to the co-op to stock up. 

Bake your nachos at 350F for approximately 15 minutes; until the cheese is melted and the beans are heated through. 
Step 11. While your nachos are baking, prep the remaining toppings. I love thinly-sliced romaine lettuce on my nachos. To chiffonade lettuce (or anything...this method is commonly used with herbs), stack your lettuce leaves on top of one another. 
Roll the leaves up tight, sort of resembling a cigar. 
Thinly slice the lettuce using a sharp knife. (Ps. Behind the scenes, trying to capture a picture of yourself slicing something is surprisingly hard when you only have two hands at your disposal. I wish someone could have documented the balancing act for you all to enjoy). 
In the end, you are left with this lovely pile of romaine, just begging to be placed on top of your nachos. Around this time, your kitchen should also be smelling like nacho heaven. 
I also love tomatoes on my nachos (in addition to the fresh salsa), so I sliced one up. They add great finishing color along with the romaine lettuce. 
Step 12. Remove the nachos from the oven and breathe in the smell of happiness. 
Step 13. Top said happiness with a few dollops of sour cream. 
Step 14. Add your tomatoes. Again, I went (slightly-more-than) halfsies on the tomatoes because T isn't a big fan. 
Step 15. As the crowning jewel, festively toss your julienned lettuce on the top of the nachos and then take a few moments to just look at your creation happily. 
Step 16. Enjoy! If you are food blogger, that mine mean daintily scooping some nachos onto a plate for a stylized photo. 
But, in real life it looks like grabbing the pan and heading downstairs with some plates and napkins to enjoy this creation while watching the game with your partner-in-crime. 

Happy fall dabblers. Here's to football watching and appetizer eating, 

-The Delicious Dabbler


Tuesday, September 3, 2013

Cantaloupe, Feta, and Prosciutto Skewers

Happy back to school day dabblers! The U of M campus is bustling with students today and I always love the energy of classes beginning again. Fall weather seems to have found us again in Minnesota and I am enjoying the cooler air today. 


Over the holiday weekend, we headed north to the cabin so Rosy could meet her quota of summer dock time. 
 Bailey far exceeded hers and spent quite a bit of time napping on the boat or on the dock. Here she is snuggled up in a towel looking cute as can be.

As always, the weekend was full of delicious food and indulgence. We all got to enjoy a slice of grams' blueberry pie on the boat as part of a late lunch. This pie was heaven. Grams has shared her crust recipe with all of us in the past, and it was as flaky and light as ever. She even sent the baked trimmings topped with cinnamon and sugar down to the dock as a pre-snack (we are spoiled). 

We also cooked out over the fire one night: burgers, corn on the cob, banana boats, and my new favorite kind of s'more...double mallow with a Reese's. Yum :)

While we were at the cabin, my fam gently "reminded" me that I haven't posted an actual recipe on here for awhile, and I realized they were indeed correct! So, thanks to them..we are flashing back to a few weekends ago, when I was invited to a summer harvest celebration in Wisconsin. Everyone was bringing a dish to share and I made one of my favorite go-to appetizers. These Cantaloupe, Feta, and Prosciutto Skewers pack a big flavor punch, have great visual appeal, and are super easy to make. 


Step 1. Assemble your cast of characters: cantaloupe, prosciutto (I love La Quercia), and feta (I used sheep's milk). 

Step 2. Remove the skin and seeds from your cantaloupe and cut it into workable-sized chunks. Slice those chunks further down into bite-sized pieces. 

Step 3. Slice your feta into bite-sized pieces. I broke the piece pictured above down into 4 pieces. Keeping your cheese cold throughout this process makes the slicing easier and will prevent the feta from crumbling during assembly. I worked in small chunks and kept the cheese that I wasn't working with at the moment in the fridge. After you have slice the feta, slice or rip off a small piece of prosciutto and roll into into a small bundle. 

Step 4. Assemble. On a small skewer or toothpick, layer one piece of cantaloupe, a piece of feta, the prosciutto bundle, and another piece of cantaloupe. I love the bright color of these and the way the layering adds visual interest.  You get this great flavor combo of the sweet cantaloupe, balanced by the saltiness of the prosciutto and the rich tang of the feta. 

Step 5. Repeat Steps 2-4 until you have created a small army of appetizers. 

Step 7. Take said appetizers to a party and enjoying amazing food in great company while gazing out at a beautiful scene (eating the entire plate in the comfort of your own kitchen is also acceptable). 


As a fun party bonus, we got to walk amongst the grape rows of Villa Bellezza. What an incredibly beautiful winery owned by the Dahlen family. Their wine is incredible and their spirit and joy even better. Check out their lovely website for more information on this magical spot. 


What appetizers have you been cooking up lately? Football season snacks will soon be upon us :)

-The Delicious Dabbler