Friday, May 20, 2011

Oatmeal Chocolate Chip Ice Cream Sandwiches


As I mentioned in my last post, I have a healthy supply of homemade vanilla ice cream at my house right now. This week, I had a potluck event and brought Oatmeal Chocolate Chip Cookies. Naturally, I stashed a few away at home. Then...in a moment of dessert genius, these delectable treats were born. These cookies are one of my favorite things...paired with ice cream, it's hard to beat. My boyfriend ate three in one sitting.

Enjoy dabblers!

Ingredients:
- 1 batch of Oatmeal Chocolate Chip Cookies
- 1 gallon of your favorite vanilla ice cream

Instructions:
1. Place 1 scoop of vanilla ice cream onto a cookie.
2. Place another cookie on top.
3. Push the top cookie down to spread the ice cream out evenly.
4. Gobble the delicious treats up :)

Pictures and Tips:


Here is my ice cream sandwich set up...cookies and the canister of ice cream that I made in my last post.


Step 1. Place a large scoop of ice cream on the flat side of one cookie.


Deliciousness in progress...


Steps 2 & 3. Put another cookie on top of the ice cream scoop and use your fingers to lightly push the top cookie down, spreading out the scoop of ice cream until it reaches the edges of the cookies.


Step 4. Sit outside in the sun and enjoy this delectable treat :)


These little sandwiches are super cute, and wonderfully delicious. They are the perfect summer time dessert...a great, informal and fun treat for parties or just for a snack.

Happy dabbling :)

-The Delicious Dabbler

Wednesday, May 18, 2011

Dabbling Inspiration: Homemade Ice Cream


Hi dabblers. Today's inspiration comes from my dad...You may be hard-pressed to find a bigger fan of ice cream than my dad. A few years ago my dad went to Target on a whim and purchased an ice cream maker because he thought it might be fun to make it at home. Well, time passed and he had not made any ice cream...so he brought the machine to me in hopes that I would whip up some ice cream on his behalf.

I thought about posting the recipe I used to make vanilla ice cream, but the recipe and method you use will depend on the ice cream maker you use. So instead, I will say that having a supply of fresh ice cream in my freezer for the past several days has been blissful. I can also say that making the ice cream was easy and super fun.   I wish you could have seen my dad while the ice cream maker was churning, just like a kid in a candy store.

Here is a picture of our ice cream machine in action:


Our machine is motorized, so it churns itself when plugged in. You have to surround the ice cream canister with ice and ice cream salt. The ice cream salt helps the ice cream cool quickly and allows you to cool the ice cream to a lower temperature than you could achieve with just the ice because it lowers the melting point of the ice.


I was able to find ice cream salt in my grocery store, located in the spices/seasonings section.


Pictured above...the result of having a stash of homemade ice cream :) Root beer floats are one of my favorite things. So simple, happy and delicious. They say summer in a glass to me.

This float features Gray's Brewing Company Root Beer. I had been searching for root beer made with real sugar, and discovered that this root beer is not only made with real cane sugar, it is also made near the hometown of my boyfriend's family. They surprised me with a case of it and I was thrilled!

I am currently on a quest for a great Key Lime Ice Cream recipe...because if there is anything my dad loves more than ice cream, it's key lime pie...so I'm going to try to create the ultimate treat for him.

Happy ice cream making dabblers!

-The Delicious Dabbler

ps. If making homemade ice cream is a little too ambitious, I understand (remember, my dad has had this machine for years). Head to your favorite ice cream parlor and buy a pint or two...you may want it when you see my next post :)

Saturday, May 14, 2011

Bacon, Egg and Toast Cups


Hi dabblers. Hope your Mother's Day weekend was filled with lots of love, family and fabulous food. Here is the recipe for the Bacon, Egg and Toast Cups. I had a lot of fun making these and they turned out wonderfully. This recipe yields 12 muffin-sized cups. I would allow for at least 2 cups per person, 3 if you have a lot of big eaters. These cups were a very simple way to serve a crowd, and they plated beautifully. A great recipe for breakfast/brunch parties. Have fun :)

Ingredients for the Cups:
-2 tbsp melted butter
-12 slices Sourdough Bread
-1 garlic clove
-6 slices of bacon
-12 eggs
Ingredients for the Topping:
-sea salt, black pepper
-parmesan cheese (appx. 1/2 c)
- chives, parsley, coarsely chopped (appx 2 tbsp each)

Instructions:
1. Preheat the  oven to 400°F. Butter 12 standard size muffin cups.
2. Place a baking rack onto a sheet pan and arrange the bacon slices on the rack. Bake until the bacon starts to crisp. Carefully remove the  pan from the oven and transfer the  bacon to a paper-towel lined plate.
3. Reduce the oven temperature to 375°F.
4. Using a rolling pin, flatten out the slices of sourdough bread.
5. Using a 4" cup, cut the bread slices into rounds.
6. Place  a round into muffin cup. Use the extra bread scraps to patch any holes.
7. Lightly brush each cup with melted butter. Bake the cups in the oven for 5-7 minutes until slightly crisp.
8. Rub each cup with  the garlic clove.
9. Cut the bacon slices in half. Place one piece into each cup.
10. Crack an egg into each cup.
11. Bake until the eggs are set. (20-25 minutes)
12. Top each cup with salt and pepper and sprinkle with parmesan cheese, chives and parsley.
13. Use a butter knife to remove the cups from the muffin pan. Serve warm and enjoy!

Pictures and Tips:


Step 2. Place a baking rack on top of a sheet pan. Arrange the bacon slices on the rack. This setup will allow the bacon fat to drip into the sheet pan. You could also could cook the bacon in a pan over the stove, but I like this method because you don't have to tend to the bacon. After you get the bacon in the oven, you can start in on the cups.

* This recipe calls for 6 slices of bacon, but I baked the entire package because let's be real...can you ever have too much bacon? Save it for a delicious lunchtime BLT, or eat it while you are preparing the cups as a chef's snack :)


Bake the bacon until it starts to get crispy. The color will change and the edges will start to curl. Adjust the baking time to your desired bacon crispyness. Remember that the bacon will cook a little more when the cups are baked.


Step 4. For this recipe, I made the Sourdough Bread in loaf pans for easy slicing. To do this, place the dough into the loaf pan for the last rise before baking.


Use a rolling pin to flatten out the slices of sourdough bread.


Step 5. Using a cup as a guide, cut rounds out of the bread slices. I used a 4" diameter glass cup from my kitchen. If you don't have one, substitute in something circular from your kitchen.


Here is a picture of a cut-out round.


Step 6. Place the bread round into the buttered muffin pan. Use your fingers to lightly push the round down into the pan. If there are any holes, use the extra bread scraps to patch them.


Step 7. Brush each cup with melted butter. Bake the cups at 375°F for 5-7 minutes until they are slighty crispy.


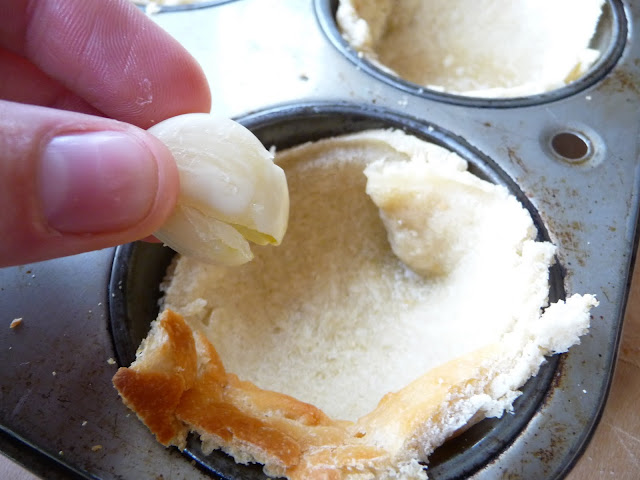
Step 8. Rub each cup with the clove of garlic. The crisp edges of the cups will help release the garlic juices, creating a delicious layer of flavor in the cups.


Step 9. Cut the bacon slices in half. Place one slice in each cup.


Step 10. Crack an egg into each cup.


Step 11. Bake the cups until the eggs are set, about 20-25 minutes. You can adjust the baking time depending on how runny you like your egg yolks...just make sure the whites are set.


Step 12.  Season each cup with salt and pepper. Then top the cups with parmesan cheese, chives and parsley. 


Step 13. Use a butter knife to help you wedge the cups out of the muffin pan. Plate the cups and serve them immediately.


Here is a picture of the Mother's Day spread from my house. I made a big batch of Cinnamon Rolls and my grandma brought over a wonderful assortment of fresh fruit.

I loved the method of this recipe...It is a great one to have in your repertoire. You could switch up the fillings to make the cups your own...sausage, veggies, beat the eggs before putting them in the cups to make little quiches, etc. When I was making these, I got the idea to make the cups out of hash browns instead of toast. Hash browns are my favorite breakfast food, so that rendition is next on my list.

Enjoy this recipe and thanks for visiting.

-The Delicious Dabbler

Thursday, May 5, 2011

Dabbling Preview: Mother's Day Breakfast


Hello fellow dabblers! I thought I would give you a preview of what I am planning to make my mom for breakfast this coming Sunday....I love to browse Martha Stewart's website for recipe ideas and I was looking at the "Mother's Day Brunch Recipes" photo gallery and saw this gem: Bacon, Egg and Toast Cups.

I love that each serving is a complete breakfast package. I think these little cups will make a really cute display, and what a great way to serve a big crowd.

I'm looking forward to switching up the recipe a little bit...I plan to use Sourdough Bread rubbed with garlic in the cups. I'm also going to top the egg cups with parmesan cheese and some chopped chives and parsley.

I plan to serve the  Bacon, Egg and Toast Cups with Cinnamon Rolls and fresh fruit.


My mom and I are going to do some gardening on Sunday after breakfast :) What are your Mother's Day plans? What will you be making?

Happy Early Mother's Day to all of the wonderful women out there!

-The Delicious Dabbler

Tuesday, May 3, 2011

Apple Cinnamon Puffs

Apple Cinnamon Puffs

This delicious recipe creation was the result of a brainstorm session on ways to use  my sweet bread starter outside of making cinnamon rolls. I was recipe browsing and looking at recipes for Monkey Bread, and then thought how great apples would go with the Monkey Bread flavor profile. I wanted to come up with a fun twist, so I decided to stuff the bread....the result: these delectable Apple Cinnamon Puffs.

These puffs make a great breakfast/brunch or dessert food....or if you are my boyfriend, a great "the first thing you eat when you walk in the door" food :) You could serve these puffs with a drizzle of caramel or with a scoop of vanilla ice cream.


Apple Cinnamon Puffs


Ingredients for the Dough:
-1 c sweet bread starter
-1/2 c granulated sugar
-1/2 c coconut oil (vegetable oil could be substituted)
-1 tbsp salt (I use fine ground sea salt)
-1 1/2 c warm water
-1 tbsp dry active yeast
-6 c all-purpose flour


Ingredients for the Filling:
-1 1/2 c apples, peeled and chopped
-1/2 tsp cinnamon
-2 tbsp lemon juice
-2 tbsp sugar


Ingredients for the Topping:
-2 tbsp butter, melted
-1/2 tsp cinnamon
-2 tbsp sugar


Instructions:
1. Attach the dough hook to your electric stand mixer. Mix starter, sugar, oil, salt, water, yeast and flour on low speed setting. Mix until incorporated (2-3 minutes).
2.  Place the dough in a large, greased bowl and cover with plastic wrap.
3. Let the dough rise overnight (approx. 12 hours).

4. Preheat oven to 325°F.
5. Place the dough onto a well-floured surface. Using a floured rolling pin, roll the  into an large oval, 1/4 inch-thick.
6. In a medium-sized bowl, stir together the filling ingredients.
7. Using a biscuit cutter, cut out a dough circle and lightly flatten it with your fingers.
8. Place a tbsp of filling onto the dough circle. 
9. Fold the dough over the filling and pinch to seal the seam. Roll the dough ball in your hands to ensure the puff is sealed.
10. Place puff on a parchment-lined baking sheet, seam side down.
11. Repeat steps 6-9 until all the dough has been used.
12. Brush each puff with melted butter.
13. Combine cinnamon and sugar in a small bowl. Sprinkle each puff with cinnamon-sugar mixture.
14. Bake puffs until golden brown.
15. Enjoy!


Pictures and Tips:


Step 1. Using the dough hook, mix the dough ingredients until well incorporated...about 2-3 minutes. While mixing, use a rubber spatula to scrape down the sides of the bowl.  Make sure that the flour in the bottom of the bowl gets mixed in. 


Step 2.  Place the dough into a large, greased bowl. I used a little bit of extra coconut oil, but butter would work as well. Cover the bowl with plastic wrap and seal the edges well.


Step 3. Allow the dough to rise over night. It will double in size and become large and puffy. The dough will then start to deflate slightly and small bubbles will appear on the surface. The longer rise time always for a slow fermentation of the dough, which adds great flavor.


Step 5. Place the dough onto a well-floured surface. Roll the dough out into a large, 1/4" thick oval.


Step 6. Stir together the apples, cinnamon, sugar and lemon juice. The lemon juice will keep the apples from turning brown while you are working with the dough and also adds a fresh zip to the filling.


Step 7. Use a biscuit cutter to cut out dough circles. It may help to lightly flour your biscuit cutter.


Flatten the dough circle out with your fingers.


Step 8. Place a tbsp of filling onto the dough circle.


Step 9. Fold the dough over the filling and bring the edges together. Use your fingers to pinch the dough together creating a tight seal. 


Lightly roll the dough in your hands to shape it into a round puff.


Steps 10 & 11. Place the puff, seam side down onto a parchment-lined baking sheet. Complete steps 6-10 with the remaining down. I was able to make 20 puffs.


Step 12. Brush the puffs with the melted butter. The butter will help the cinnamon-sugar topping stick, and will help the puffs get golden brown in the oven.


Step 13. In a small bowl, combine the cinnamon and sugar.


Sprinkle each puff with the mixture.


Step 14. Bake the puffs until they are golden brown. 


Step 15. Enjoy! You can allow the puffs to cool or eat them right out of the oven. The puff filling will be very warm because of the steam trapped inside. Here is a picture of the inside...delicious little puff pockets of apple goodness.


I love the way this recipe turned out...so fun and absolutely delicious. This recipe/method is very versatile...you could mix the fillings up to make sweet or savory puffs. I'm already imagining cheesy puffs dipped in marinara sauce...or spinach-and-artichoke-dip puffs...yum!


Enjoy the puffs and as always, thanks for visiting!


-The Delicious Dabbler