The time has come dabblers, for the ever illusive "pork chop post." This is a weeknight meal that I made on a whim a few weeks ago. I forced myself to take photos for the blog and put one photo out via social media so I would be accountable to post it :) A tad late, but here it is for your cooking pleasure.
Pork chops are not #1 on my fave-protein-items list, but they are a nice weeknight-switch up and we happen to have a bunch in the freezer right now after a sale. I think people get scared away from pork chops because it's easy to overcook them and dry pork chop is pretty nasty. But, have no fear: you have
braising in your cooking arsenal!
Many of my friends have reported that they feel intimated by cooking-especially by something that looks on the "fancier" side. My response is that truly, you can do this! Plus, food failures are hilarious...so grab someone you like and have a cooking adventure together. You can't build skills or confidence unless you push yourself a bit.
Be brave. Be bold. Go buy some pork chops and prepare for a hopefully-helpful photo montage:
To get started, heat some extra virgin olive oil over medium hit in a skillet. This will be the pan you use for the whole process, so make sure your skillet is deep enough to accommodate a lid fitting over your pork chops.
Enter, our chop friends. While your olive oil is heating, season one side of your chops. I like to use sea salt, black pepper, cayenne pepper, and garlic powder. No need to measure...just sprinkle so that you get even coverage, adjusting the cayenne pepper for the amount of spice you like.
When your olive oil is hot, add your pork chops- seasoned side down. How can you tell when your olive oil is hot enough to add your pork chops? A few suggestions:
- You will be able to smell it. The olive oil fragrance will build in poignancy as it warms up.
- If you move the pan, the olive oil ripples as it moves across the surface.
- Take a kernel of sea salt and drop it in the pan. Little bubbles should immediately form around it.
If you don't hear that classic sizzle noise when your pork chop makes contact with the pan, the pan isn't hot enough and you won't get the great searing that you are looking for.
While the first side is searing, take the opportunity to season the other side.
How will you know when the first side is done and ready to be flipped? Awesome question. The pork chop should easily come away from the pan when you try to pick it up. If you experience any resistance, it isn't ready.
Here is a picture of the pork chops after they have been flipped. You can see that searing creates a caramelized crust of sorts on the top of the pork chop. The crust helps to seal in the moisture, develop depth of flavor, and improve the visual appeal and texture of the chops.
I like to sear all edges, so use your tongs to sit the chops up on their sides. The edges won't take as long, but appreciate a little color as well.
Here's a visual of a seared edge.
When you have seared your way around the chops, grab a plate and take them out of the pan for a brief rest. You should be left with a surface that looks something like this...a bit of olive oil and a whole bunch of brown bits. Those bits=massive flavor. We want to leverage all of that flavor in our sauce for these chops, so the next step is "deglazing" (ie. using liquid to get all the brown bits off the bottom of the pan). The liquid you deglaze with is up to you. I really like apple flavors with pork chops and we had some hard apple cider in the fridge the night I made these, so I went with that. Other ideas: apple juice/cider, white wine, or chicken stock.

Add your chosen liquid to the pan. This will likely create a large steam moment (your pan is hot!), so don't be alarmed. I couldn't capture it on camera. If you are using something alcoholic and are cooking over a gas stove...fire safety first: pick your pan up off the stove, add your liquid, and then return the pan to the stove. As soon as you have added your liquid, use your tongs to scrape all those brown bits off your pan. (Important note: this is one of the many reasons I prefer to cook in traditional pans (versus non-stick). If you are using a non-stick pan, you are likely also scraping the coating and chemicals into your sauce).
After you have gotten all those bits off the bottom of the pan, add your chop friends back into the mix. They are going to cook in this environment and take on that delicious apple cider flavor. I love this method because braising keeps everything moist. It's hard to dry something out when it is surrounded by liquid, right?
At this point, I like to cover the chops to seal the heat and moisture in and wish them wonderful cooking thoughts.
Okay, now that your main dish is happily bubbling away: let's start the side! Cheesy polenta/quinoa with power greens. This particular component got a lot of love online and I was excited to show you how simple it is. Have you seen these Ancient Harvest products in your store? Our co-op carries this brand and it is the best thing to speed up a healthy side dish. It is organic and pre-cooked. All you need to do is heat it up and add in your extras. The other characters in this mix: chicken broth and power greens (baby kale and spinach).
Weird-looking start, right? Just unwrap the quinoa/polenta blend and cut it into large chunks in a medium-sauce pan over medium-low heat.
Add in your liquid and use a fork to begin to break up the pieces of quinoa/polenta. I pour in enough chicken stock to cover the quinoa/polenta. You can add more as you go. If you want this to be on the richer side, you could also add in milk or cream.
The consistency will get creamier as you go and you will start to see air bubbles popping up (the mixture is boiling). At this point, you can reduce the heat and add in your greens.
Add as many greens as your pan can hold. I am always amazed by how much spinach and kale cook down- so be aggressive with your adding. If this picture stresses you out, use a bigger pan to begin with :)
I use my tongs to begin folding the quinoa/polenta up and over the greens pile. The heat from the quinoa/polenta will cook the greens and in a few quick moments, the pan appears much more manageable.
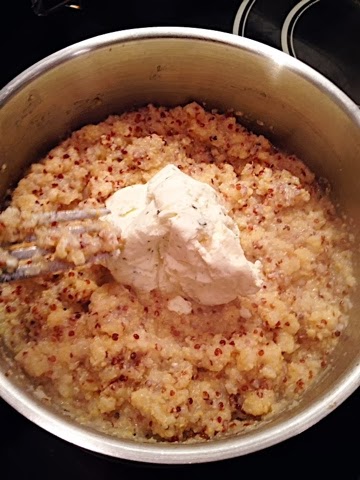
Next step: add your cheese! (the best part). We had some soft herb/chive cheese in the fridge this night, but use your favorite. I used about a cup of cheese, but I encourage you to break out of the measurement mold! The amount you add depends on your taste and the type of cheese you are using, so grab a spoon, taste your creation, and adjust from there :) When your cheese is melted in, remove the pan from heat and cover it to keep it warm.
Meanwhile, across the stove in pork chop land...your chops are likely near done. If you are a meat thermometer person, you are looking for 145 degrees. Random side-note, who knew that the internal temperature of pork was a
controversy in 2011?
I'm not a meat-thermometer person unless it is the turkey on Thanksgiving, so I usually make a small cut into the pork chop to make sure the juices that emerge from the cut run clear and that the meat is predominantly "white". If you clicked on the controversy link, you will note that the article makes specific mention that some pink is okay.
At this point, remove your chops from the pan to let them rest. This allows the juices in the meat to redistribute so that they don't all run out when you make your first cut into your chop.
Left in your pan is that wonderful cider and all that delicious pork flavor. I let this sauce cook uncovered for about 3 minutes so that it reduces and the flavor intensifies.
While that is happening, you can begin plating. Take a spoon and make a little nest of your cheesy quinoa/polenta-power-greens mixture.
Place a chop on top and locate your plate near your cider sauce for easy transport.
Spoon a bite of your cider reduction over the chop and voila: you just made a fantastic meal.
Serve it up to your lucky dinner companion and be proud of yourself!
Happy cooking,
-The Delicious Dabbler